Arcserve Backup バックアップスケジュールの考え方と設定例
Arcserve Backup バックアップスケジュールの考え方と設定例
https://www.arcserve.com/sites/default/files/wp-doc/asbu-r16x-schedule.pdf
MRTG環境構築手順例
MRTG環境構築手順例
環境
・MTRG設定OS
CentOS 7.9
IP 192.168.8.107
・監視対象機器IP 192.168.8.253
・監視対象機器SNMP コミュニティ名 public
① 監視対象機器の SNMPを有効にする
手順詳細は各機器ごとに確認
② ソフトウェアのインストール
# yum -y install net-snmp-utils
③ Firewall httpポートを開ける
# firewall-cmd --zone=public --add-service=http --permanent
# firewall-cmd --reload
# firewall-cmd --list-all
④ httpd 起動
# systemctl start httpd
# systemctl enable httpd
⑤ 監視対象の機器への SNMP接続確認
# snmpwalk -v1 -c public 192.168.8.253 .1.3.6.1.2.1.2
⑥ MRTG設定
# cfgmaker --out=/etc/mrtg/mrtg.cfg --global "workdir: /var/www/mrtg" --global "Language:eucjp" public@192.168.8.253
# LANG=ja_JP.eucJP mrtg /etc/mrtg/mrtg.cfg
# LANG=ja_JP.eucJP mrtg /etc/mrtg/mrtg.cfg (2回実行)
# indexmaker /etc/mrtg/mrtg.cfg > /var/www/mrtg/index.html
# vi /etc/httpd/conf.d/mrtg.conf
<Location /mrtg>
Require ip 192.168.8.0/24 -> アクセスするPCのIPを追加
AddDefaultCharset off -> 追加
</Location>
# vi /etc/cron.d/mrtg
*/5 * * * * root LANG=C LC_ALL=C /usr/bin/mrtg /etc/mrtg/mrtg.cfg --lock-file /var/lock/mrtg/mrtg_1 --confcache-file /var/lib/mrtg/mrtg.ok
⑦ 動作確認
ブラウザから http://192.168.8.107/mrtg にアクセスしてグラフが表示されればOK
参考資料(書籍)
CentOS7で作るネットワークサーバ構築ガイド 第2版 1804対応
postfix+dovecotの環境にthunderbirdから接続できない
postfix+dovecotの環境にthunderbirdから接続できない
/var/log/maillog
improper command pipelining after EHLO from unknown[xxx.xxx.xxx.xxx]: QUIT\r\n
対策
thunderbirdのユーザー名を user@domain から user のみに変更する
Postfix テスト環境構築
Postfix テスト環境構築
--------------------------------------------------------------------------------------------------
目的
・Postfixの基本的な設定を理解する
・Postfix ウイルス対策・SPAM対策の基本的な設定を理解する
postgrey、amavis、clamav、 spamassassin
--------------------------------------------------------------------------------------------------
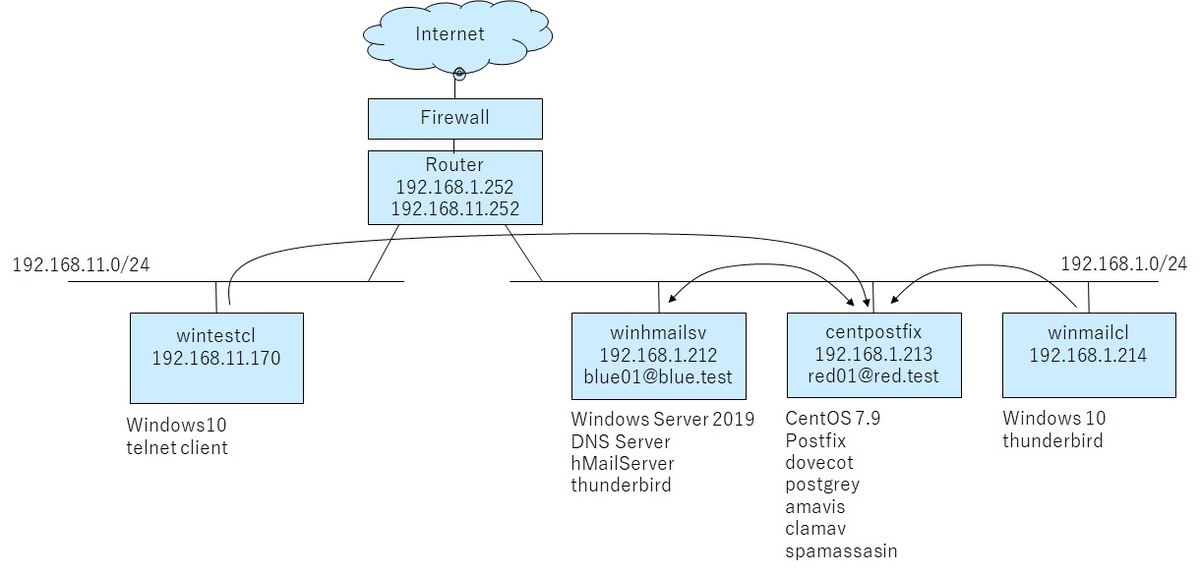
① Postfix テスト環境概要 (Postfix、dovecot、postgrey、amavis、clamav、 spamassassin)

テスト環境構築のゴール
・red01@red.test と blue01@blue.test ユーザー間でメールの送受信ができる
・red01@red.test宛てのメールに対し、ウイルス対策・SPAM対策が機能することを確認する
--------------------------------------------------------------------------------------------------
② OS基本設定
・winhmailsv
Windows Server 2019
IP:192.168.1.212/24 G/W:192.168.1.252 DNS:192.168.1.212
ドメイン参加なし
・centpostix
CentOS 7.9
IP:192.168.1.213/24 G/W:192.168.1.252 DNS:192.168.1.212
テスト環境のため SELinux 無効
・winmailcl
Windows 10
IP:192.168.1.213/24 G/W:192.168.1.252 DNS:192.168.1.212
ドメイン参加なし
・wintestcl
Windows 10
IP:192.168.11.170/24 G/W:192.168.11.252 DNS:なし
ドメイン参加なし
--------------------------------------------------------------------------------------------------
③ winmailsv への DNS Sever設定
・DNS Server の役割を有効にする
・DNS Server 前方参照ゾーンの作成
blue.test
red.test
・DNS Server 逆引きゾーンの作成
192.168.1
・blue.test ゾーン レコードの作成
Aレコード 名前:winhmailsv
IPアドレス:192.168.1.212
MXレコード 完全修飾ドメイン名:blue.test.
メールサーバーの完全修飾ドメイン名:winhmailsv.blue.test
優先順位:10
・red.test ゾーン レコードの作成
Aレコード 名前:centpostfix
IPアドレス:192.168.1.213
MXレコード 完全修飾ドメイン名:red.test.
メールサーバーの完全修飾ドメイン名:centpostfix.red.test
優先順位:10
・設定確認
C:\Users\Administrator>nslookup
既定のサーバー: winhmailsv.blue.test
Address: 192.168.1.212
> set type=mx
> blue.test.
サーバー: winhmailsv.blue.test
Address: 192.168.1.212
blue.test MX preference = 10, mail exchanger = winhmailsv.blue.test
winhmailsv.blue.test internet address = 192.168.1.212
>
> red.test.
サーバー: winhmailsv.blue.test
Address: 192.168.1.212
red.test MX preference = 10, mail exchanger = centpostfix.red.test
centpostfix.red.test internet address = 192.168.1.213
>
--------------------------------------------------------------------------------------------------
④ winhmailsv への hMailServer インストールと設定
・.Net Framework 3.5 Features 機能を有効にする
・hMailServer インストール (hMailServer-5.6.8-B2574.exe)
・hMailServer 設定
テスト環境のため Auto-ban 無効 (Settings->Advanced->Auto-ban)
ドメイン作成 blue.test (Domains->Add)
ユーザー作成、パスワード設定 blue01 (Domains->blue.test->Accounts->Add)
・Thunderbird インストール (Thunderbird Setup 102.0.exe)
・Thunderbird アカウント設定
名前 blue01
メールアドレス blue01@blue.test
受信サーバー
ホスト名 winhmailsv.blue.test
ポート番号 110
接続の保護 なし
認証方式 通常のパスワード認証
ユーザー名 blue01@blue.test
送信サーバー
ホスト名 winhmailsv.blue.test
ポート番号 587
接続の保護 なし
認証方式 通常のパスワード認証
ユーザー名 blue01@blue.test
・hMailServer 送受信テスト
blue01@blue.testからblue01@blue.test(自分自身)への送受信ができることを確認する
参考URL
https://t-dilemma.info/hmailserver-local-mail-test-env/
--------------------------------------------------------------------------------------------------
⑤ centpostfix への Postfix、Dovecot のインストールと設定
・Postfixインストールの確認
# yum list installed | grep postfix
インストールされていない場合はインストール
・dovecotインストールの確認
# yum list installed | grep dovecot
インストールされていない場合はインストール
・/etc/postfix/main.cf の編集
myhostname = centpostfix.red.com
mydomain = red.test
inet_interfaces = all
inet_protocols = ipv4
mydestination = $myhostname, localhost.$mydomain, localhost, $mydomain
local_recipient_maps = unix:passwd.byname $alias_maps
home_mailbox = Maildir/
smtpd_banner = $myhostname ESMTP
masquerade_domains = red.test
message_size_limit = 20971520
smtpd_sasl_auth_enable = yes
smtpd_sasl_type = dovecot
smtpd_sasl_path = private/auth
broken_sasl_auth_clients = yes
smtpd_recipient_restrictions =
permit_mynetworks,
permit_sasl_authenticated,
reject_unauth_destination
・/etc/postfix/master.cf の編集
submission inet n - n - - smtpd
・Postfix config check
# postconf -n
# postfix check
・/etc/dovecot/dovecot.conf の編集
・/etc/dovecot/conf.d/10-auth.conf の編集
disable_plaintext_auth = no
auth_mechanisms = plain login
・/etc/dovecot/conf.d/10-mail.conf の編集
mail_location = maildir:~/Maildir
・/etc/dovecot/conf.d/10-ssl.conf の編集
ssl = no
・/etc/dovecot/conf.d/10-master.conf の編集
unix_listener /var/spool/postfix/private/auth {
mode = 0666
user = postfix
group = postfix
}
・dovecot config check
# doveconf –n
・サービス起動
# systemctl start postfix
# systemctl start dovecot
・サービス自動起動設定
# systemctl enable postfix
# systemctl enable dovecot
・サービス ポート確認
# netstat –nat
25,587,110 のポートがオープンされていること
・ユーザー作成
# useradd red01
# passwd red01
・接続テスト
# perl -MMIME::Base64 -e 'print encode_base64(“red01\0red01\0password");’
password -> red01のパスワード
出力された結果を保存する
(telnet がインストールされていない場合はインストールする
ehlo red.test
AUTH PLAIN
“perlコマンドの出力結果を張り付け”
235 2.7.0 Authentication successful が出力されれば OK
quit
同様にテスト
・winmailcl への Thunderbird インストール (Thunderbird Setup 102.0.exe)
・ winmailcl Thunderbird アカウント設定
名前 red01
メールアドレス red01@red.test
受信サーバー
ホスト名 centpostfix.red.test
ポート番号 110
接続の保護 なし
認証方式 通常のパスワード認証
ユーザー名 red01
送信サーバー
ホスト名 centpostfix.red.test
ポート番号 587
接続の保護 なし
認証方式 通常のパスワード認証
ユーザー名 red01
・メール送受信テスト
blue01@blue.testからred01@red.testへのメール送信と受信ができることを確認する
red01@red.testからblue01@blue.testへのメール送信と受信ができることを確認する
参考URL
https://www.rem-system.com/mail-postfix01/
https://www.rem-system.com/mail-postfix02/
--------------------------------------------------------------------------------------------------
⑥ centpostfix への postgrey のインストールと設定
・postgrey のインストール
# yum -y install epel-release
# yum -y install postgrey
・/etc/postfix/main.cf の編集
smtpd_recipient_restrictions =
permit_mynetworks,
permit_sasl_authenticated,
reject_unauth_destination,
check_policy_service inet:127.0.0.1:10023
・Postfix config check
# postconf -n
# postfix check
・/etc/sysconfig/postgrey の編集
POSTGREY_OPTS=“--inet=127.0.0.1:10023 --delay=60"
・postgrey サービス起動
# systemctl start postgrey
・postgrey サービス自動起動設定
# systemctl enable postgrey
・postfix サービス再起動
# systemctl restart postfix
・postgrey 動作テスト
wintestcl にて実行 (別セグメントのPCから行う)
C:\> telnet 192.168.1.213 25
220 centpostfix.red.com ESMTP
helo blue.test
250 centpostfix.red.com
mail from:blue01@blue.test
250 2.1.0 Ok
rcpt to:red01@red.test
450 4.2.0 <red01@red.test>: Recipient address rejected: Greylisted for 60 seconds -> 初回は reject される
quit
221 2.0.0 Bye
ホストとの接続が切断されました。
C:\> telnet 192.168.1.213 25 -> 60秒以上経過後に retry
220 centpostfix.red.com ESMTP
helo blue.test
250 centpostfix.red.com
mail from:blue01@blue.test
250 2.1.0 Ok
rcpt to:red01@red.test
250 2.1.5 Ok
data
354 End data with <CR><LF>.<CR><LF>
test.
.
250 2.0.0 Ok: queued as 2FFF421B17D0
quit
221 2.0.0 Bye
ホストとの接続が切断されました。
参考URL
--------------------------------------------------------------------------------------------------
⑦ centpostfix への amavis、clamav、 spamassassin のインストールと設定
・clamav のインストール
# yum -y install clamav clamav-update
・clamav パターンファイルの更新
# freshclam
・amavisd と clamav Server のインストール
# yum -y install amavisd-new clamav-scanner clamav-scanner-systemd
・/etc/amavisd/amavisd.conf の編集
$mydomain = ‘red.test’;
$myhostname = ‘centpostfix.red.test’;
$notify_method = 'smtp:[127.0.0.1]:10025’;
$forward_method = 'smtp:[127.0.0.1]:10025‘;
@local_domains_maps = ( [".$mydomain","red.test"] );
$final_spam_destiny = D_PASS;
・amavisd、clamav、spamassasin サービスの起動
# systemctl start clamd@amavisd amavisd spamassassin
・amavisd、clamav、spamassasin サービスの自動起動設定
# systemctl enable clamd@amavisd amavisd spamassassin
--------------------------------------------------------------------------------------------------
・/etc/postfix/main.cf の編集(最終行に追加)
content_filter=smtp-amavis:[127.0.0.1]:10024
・/etc/postfix/master.cf の編集(最終行に追加)
smtp-amavis unix - - n - 2 smtp
-o smtp_data_done_timeout=1200
-o smtp_send_xforward_command=yes
-o disable_dns_lookups=yes
127.0.0.1:10025 inet n - n - - smtpd
-o content_filter=
-o local_recipient_maps=
-o relay_recipient_maps=
-o smtpd_restriction_classes=
-o smtpd_client_restrictions=
-o smtpd_helo_restrictions=
-o smtpd_sender_restrictions=
-o smtpd_recipient_restrictions=permit_mynetworks,reject
-o mynetworks=127.0.0.0/8
-o strict_rfc821_envelopes=yes
-o smtpd_error_sleep_time=0
-o smtpd_soft_error_limit=1001
-o smtpd_hard_error_limit=1000
・Postfix config check
# postconf -n
# postfix check
・postfix サービス再起動
# systemctl restart postfix
・ウイルスチェック動作試験
winhmailsvにて
一時的にウイルス対策を無効にする(Windows Defender リアルタイム保護を無効)
下記URLにアクセスし、表示内容をeicar.comとして保存
https://www.eicar.org/download/eicar.com
blue01@blue.testからred01@red.testへ eicar.comを添付してメール送信
red01@red.test へメールが届かないことを確認する
centpostfix の /var/log/mailog を確認し、メールが block されていることを確認する
ウイルス対策を有効に戻す
・SPAM 対策動作試験
winhmailsvにて
blue01@blue.testからred01@red.testへメール送信(下記内容を本文に記載)
XJS*C4JDBQADN1.NSBN3*2IDNEN*GTUBE-STANDARD-ANTI-UBE-TEST-EMAIL*C.34X
winmailclにて
red01@red.test でメールを受信し、件名に ***Spam*** がついていることを確認する
参考URL
https://www.server-world.info/query?os=CentOS_7&p=clamav
https://www.server-world.info/query?os=CentOS_7&p=mail&f=6
http://www.limber.jp/2011/01/11/336
https://help.eset.com/emsx/7.2/ja-JP/antispam_test.html
https://blog.tinned-software.net/setup-amavisd-new-with-spamassassin-and-clamav-with-postfix/
--------------------------------------------------------------------------------------------------
FortiGate 設定資料 (書籍)
FortiGate 設定資料 (書籍)
FortiGate完全攻略
FortiGateで始める 企業ネットワークセキュリティ
WSUS構築
WSUS構築 (Windows Server 2019)
参考資料
標準テキスト Windows Server 2012 R2 構築・運用・管理パーフェクトガイド
P.462-P.479
2022.6.17時点で
・製品の選択
デフォルトで Windows が選択されている
・ダウンロード容量
製品の選択でデフォルトの Windows が選択されている状態で 約500GB
Windows10 関連のみを選択した状態で 約300GB
・製品の選択は最小限から始める
後から製品選択を解除して、サーバークリーンアップウィザードを実行してもダウンロード容量が減らない(ダウンロード完了前に実行したので、ダウンロード完了後であれば減るのかもしれない)?
・WSUSの役割を削除し、再度追加しても設定は初期化されない
OSの再インストールが必要
・WIDデータベースの初期化方法は未確認
・Windows10 Client
wuauclt /detectnow ではなく usoclient を使う必要がある?
・自動承認
自動承認を有効、手動で同期、ではダウンロードが開始されない
自動承認 規則の実行が必要
・Microsoft Report Viewer 再頒布可能パッケージ 2012 インストール 参照URL (2022.6.22 追記)
https://heilel.hatenablog.jp/entry/2018/05/01/154047